World's Largest Logic Puzzle
by Alex Pei
Answer: BLACK WASP
ICE HOCKEY
STRAW POLL
MOHS SCALE
INSIDE OUT
DROP SAFE
BLUE MOON
ORGAN PIPE
GNAWS OFF
BUNNY HOP
BLACK WASP
ICE HOCKEY
STRAW POLL
MOHS SCALE
INSIDE OUT
DROP  SAFE
BLUE  MOON
ORGAN PIPE
GNAWS  OFF
BUNNY  HOP
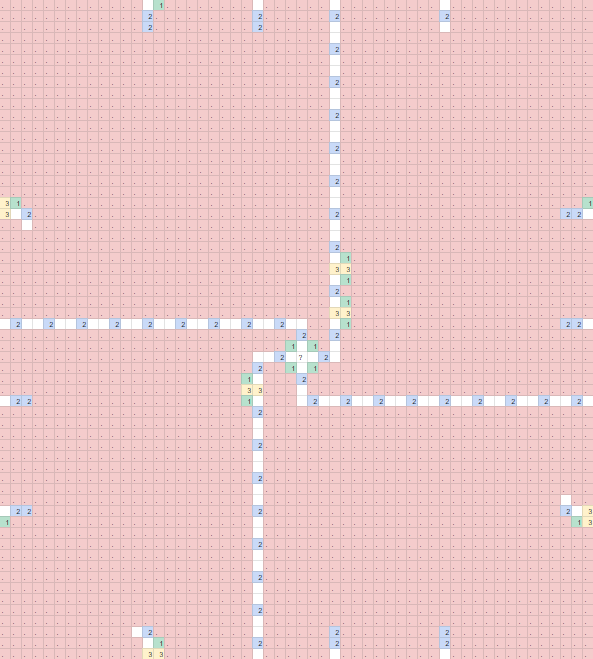
After unzipping the folder, and taking a look at a couple of files, we can infer that our puzzle is actually one giant Fillomino puzzle! We can assume .'s are either just walls, or filler for whatever size the block is in (this in fact still makes a unique Fillomino, if one is a stickler about this being a rectangular grid). Now begins the work of actually interpreting what is going on.
Fillomino
We can see that certain blocks of the file tend to repeat over and over, across files. Upon closer inspection, we find that there are 60x54 blocks which are repeated, along with an extra 3 character margin. This lets us parse our 6 GB monstrosity into something more reasonable. Let's take a look at the puzzle that results.
.'s are red, 1's are green, 2's are blue, 9's are orange in diagrams below
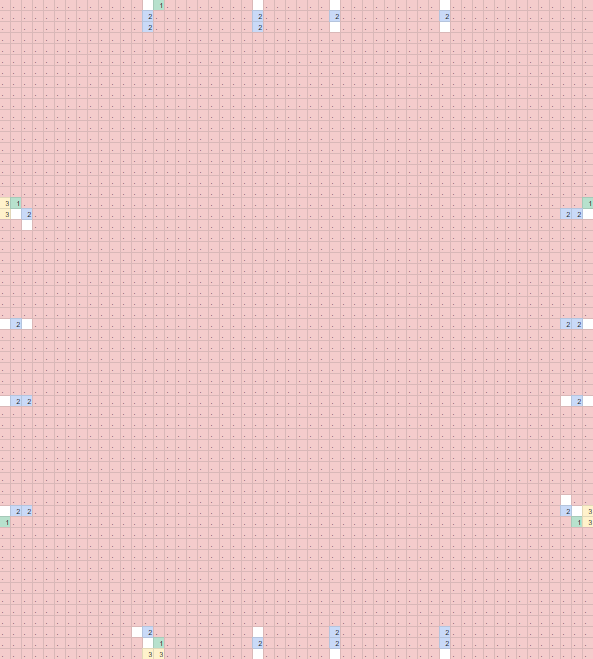
This particular block seems to be uninteresting and filler.
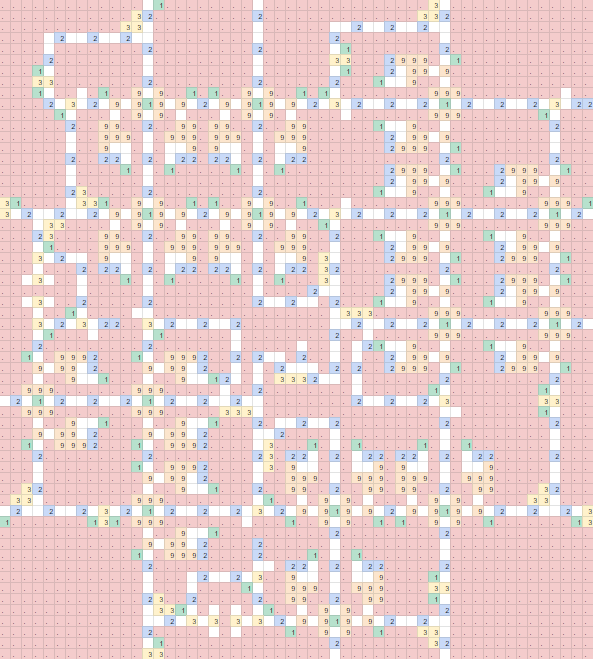
This block is the most complicated, and seems the most promising to look at first.
Wires and Data Flow
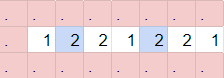
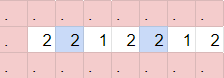
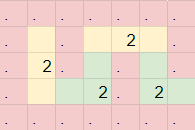
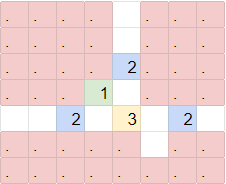
Let's start by looking at how decisions in logic can be propagated throughout the puzzle. This is primarily done by using chains of 2's, as shown below. There are essentially 2 states here that each “wire” can take.
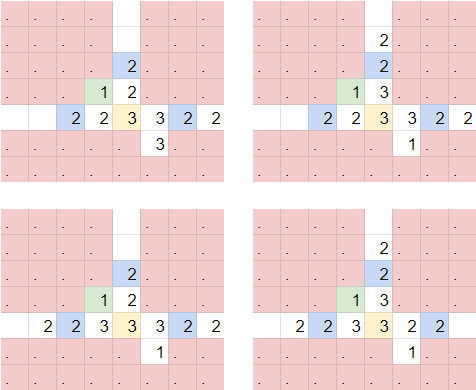
These wires can turn and split as well. (Each block of interaction for a 2 is highlighted here)
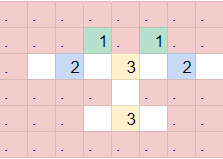
There are also crossover gadgets, which essentially pass the information through each other to opposite sides.
Note how wires repeat every 3 cells, so sometimes we need to offset wires such that they line up in order to input in other gadgets.
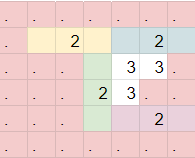
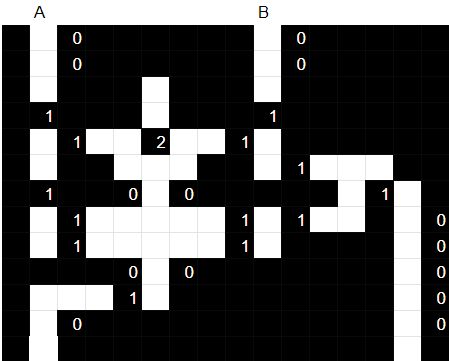
Logic Gates
In order to actually determine the meaning of each state, we have to look at a different gadget, which will let us orient our wires to have a direction.
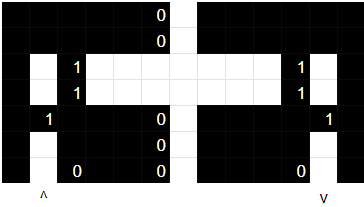
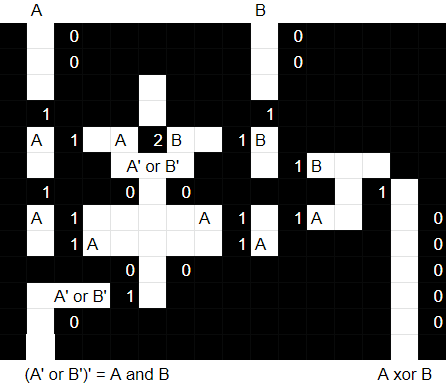
This gadget above contains 4 possible states shown as follows.
If we think about logic gates that have 3 outputs of 1 state, and 1 of the other, we come up with AND gates and OR gates. Indeed, this was intended to represent an OR gate, with 2's pointing “forward” with the data flow as True, and “backwards” from the flow as False. Alternatively, this could represent an AND gate with these 2 labels flipped, but for clarity, we will only use the first interpretation stated here.
The important takeaway is that this is an OR gate, taking inputs from the top and left, and giving its output to the right, giving us the flow of data through the puzzle. There's one last small gadget to cover though.
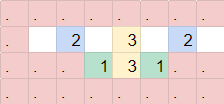
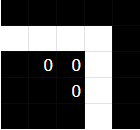
The below gadget is basically a NOT gate, flipping the input into the other value.
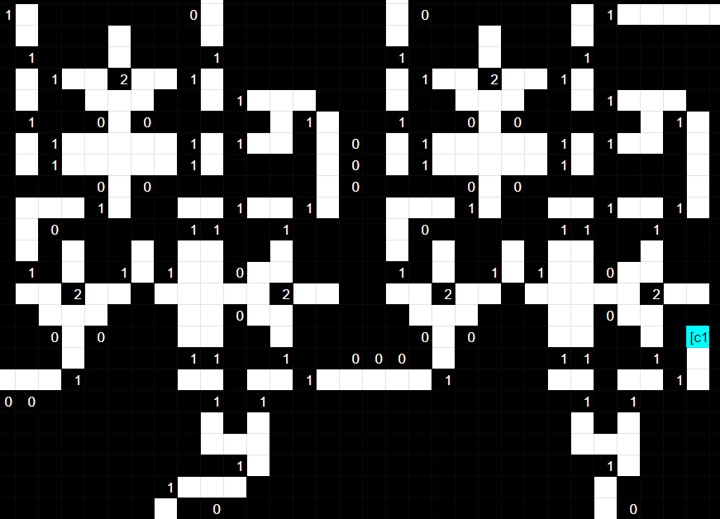
Putting the Fillomino together
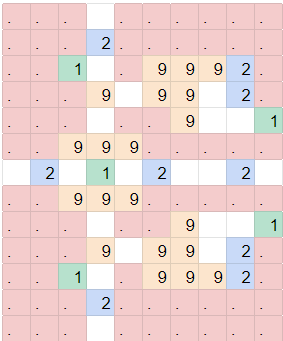
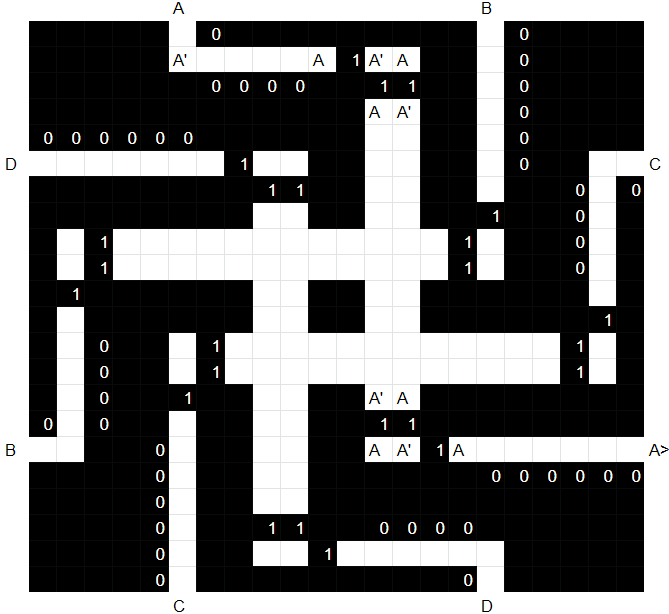
With all of this knowledge, we can now tackle the task of breaking down the body of the complicated block more.
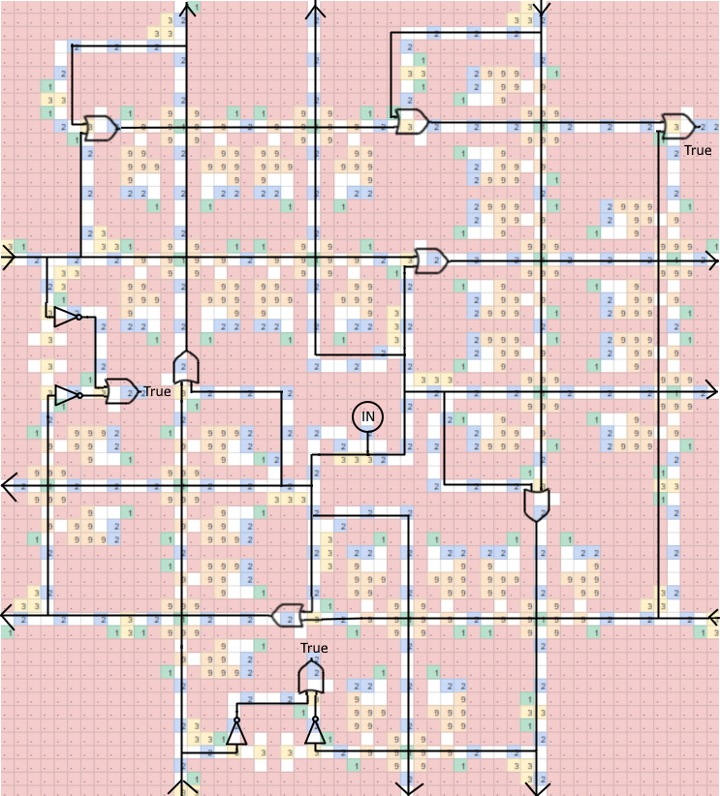
At the center of the block, we have a single input, propagating information outwards. In addition, there are 3 checks in this block. Finally, there are “inner” outputs, which simply propagate whether the center input is True, and “outer” outputs, which OR the center with the input coming from the other side.
The left check ensures that we don't simultaneously have both the left input is True and the right or center input is True, and the bottom check ensures that we don't simultaneously have both the bottom input is True and the top or center input is True. Lastly, the top right check ensures that at least one input in this entire block (including the center) is True.
We can also look at the other non-filler block now too.
This block is essentially counting the number of inputs from its surroundings and makes sure that it is the same number as 5-(center number). This can span from 0 to 4—though only 0-2 are used here, with the center number being 3, 4, or 5.
Writing this out, we care about possibly 0-4 directly adjacent inputs, and making sure every “normal” block has at least 1 input from the top/bottom/left/right/center, but not multiple, resulting in a conflict. Some thought makes this feel reminiscent of another logic puzzle genre, Akari! Let's write some code and convert our Fillomino down to a (still large, but more interpretable) Akari.
Akari
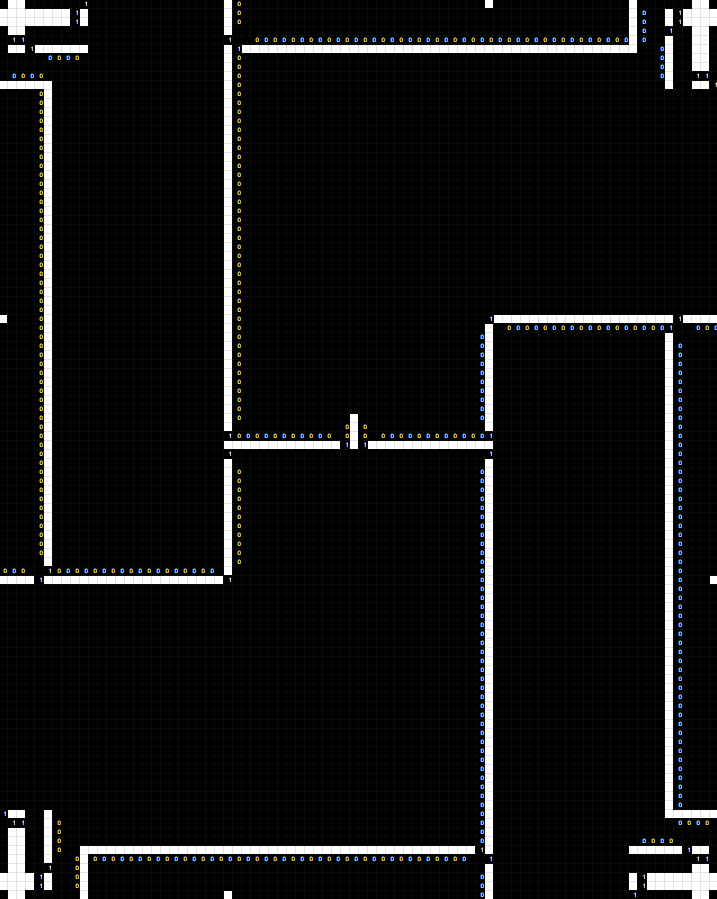
Here is the converted Akari puzzle, with walls represented by . or a clue 0, 1 or 2, and open cells represented by ?.
We do the same initial analysis again, where we have 80x100 blocks now instead, along with a 3 cell padding around the sides once again. There are only 2 main classes of blocks here, so let's take a quick look at the simpler block.
Wires, Data Flow, and a NOT gate
Wires in this genre are simply long tunnels, padded with 0s to ensure there can be no lights in the middle. (These 0's were the source of many errata for the author during construction and testsolving)

States are determined by whether there is light incoming into the wire or not, which would need to be covered by the receiving end. We will assign an incoming light as True and a lack thereof as False, though interpreting the rest of the following solution as the dual of this assignment is also possible.
Once again, these wires can easily turn and split as well by simply chaining lots of straight wires.
That explains most of the simple block, which is simply taking the central input and propagating it in 8 directions. The 4 sides simply get light passed through, but understanding the corners requires a little more effort. The corners always form the same configuration across blocks, so let's look at that separately.
Crossovers are much simpler in this genre, simply requiring a configuration similar to below. Note in this case we have inputs and outputs both going from the bottom. This is not always true though, and care must be taken about the state of the inputs and outputs. (For the author, this was the other source of many errata).
There are also “NOT” gates, which are just simply wires that turn a bit differently, causing a change in state. There are also other methods used that can be determined by simple analysis further on.
By tracing inputs through the corners, we can see that this corner gadget simply passes adjacency info diagonally through to the opposite corner. One example is notated in more detail here. (A' means the opposite of A)
So in essence, each block will pass information to all adjacent blocks, including adjacent ones.
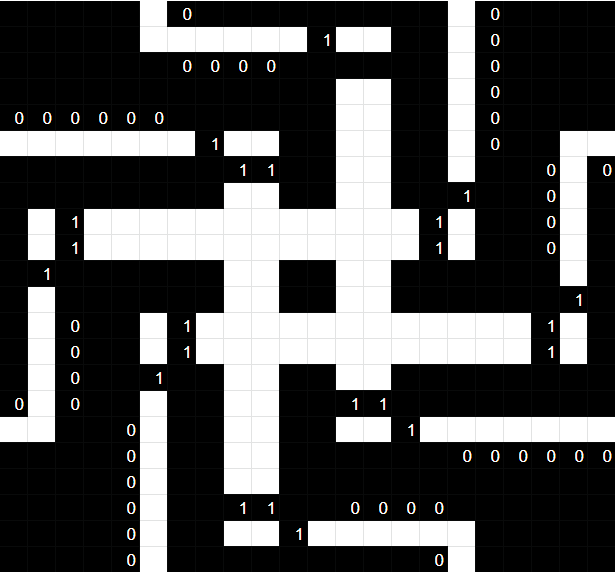
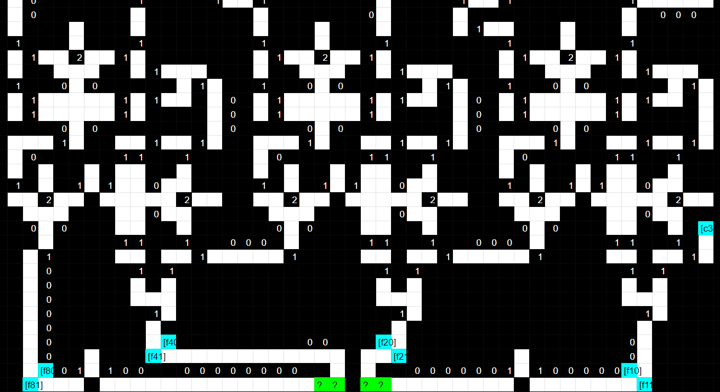
Now, let's finally move on to the more interesting block. The image below has the variations marked in cyan and green.
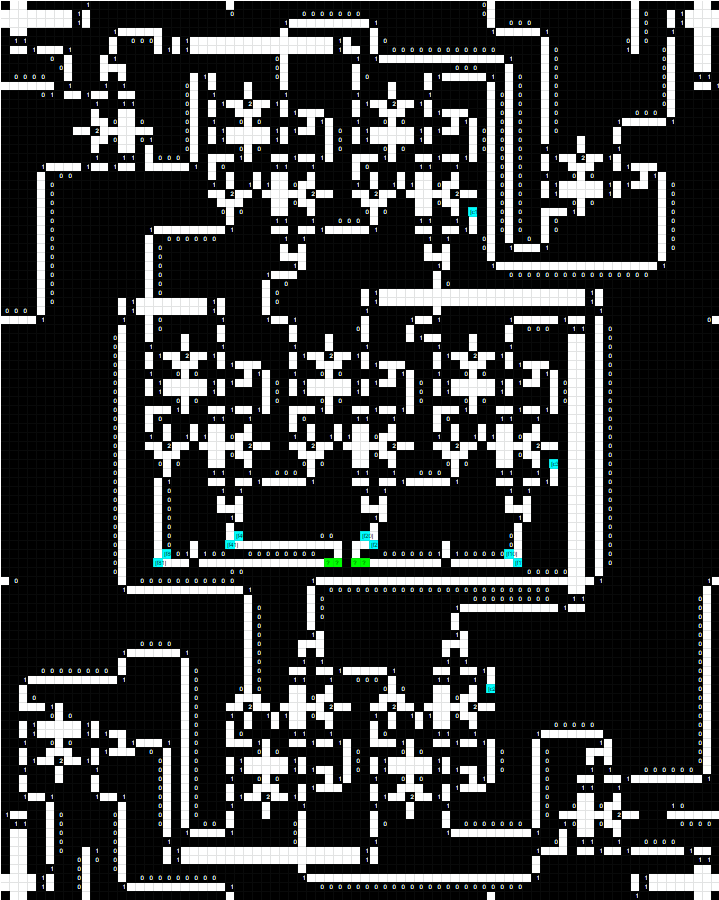
This block seems to take in information from all adjacent blocks, and condense it into a final check. Let's now examine the gadgets which are repeated many times in this puzzle, starting with those that simply take the immediate inputs.
Adders
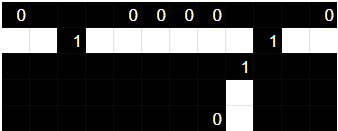
There are 2 gadgets here which work together to produce 2 related outputs. Marking the left path gives us the final output of (A' or B')', which is actually A and B (see De Morgan's laws), while the right gives us A xor B.
These two particular outputs given inputs are a half adder, used to do summations over bits. We may think then that the larger gadget that this feeds into is then a full adder, and that would be correct! Below is a 2-bit full adder, outputting 3 bits.
The most important part to note here is the carry bit that comes from the right. This is one of the bits that vary between blocks, with it being set randomly to be 0 or 1. This means that for each sum, we will sometimes have to add an extra 1 to the final output.
Of course, we do this one more time with a 3-bit full adder as well, including randomly adding an extra carry bit.
Finally, the bottom cyan and green simply randomly flips final output bits independently, before returning a desired “sum” in green.
To summarize, this block takes in the inputs from the 8 surrounding cells, takes a sum, and has a desired output with some obfuscation based on carry bits and final outputs. Having clues which count the number of marked cells surrounding it, including diagonals sounds a lot like Minesweeper! Time to reparse the puzzle one last time.
Minesweeper
It's a 19x13! Let's just solve this by hand to make the author happy.
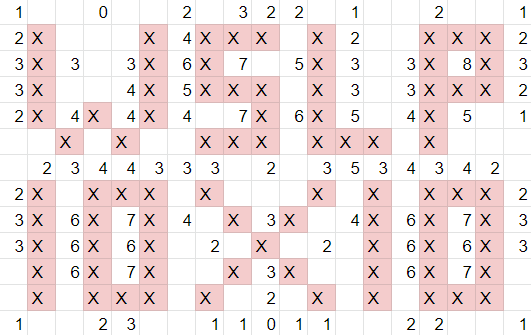
This gives us the cluephrase WSLP 10X10. The title of this puzzle is called World's Largest Logic Puzzle, or WLLP. Also featured in this hunt is World's Smallest Logic Puzzles, or WSLP. In this puzzle there is a single 10x10 grid located at the bottom of the puzzle, which also happens to be the answer to this puzzle.
BLACK WASP
ICE HOCKEY
STRAW POLL
MOHS SCALE
INSIDE OUT
DROP  SAFE
BLUE  MOON
ORGAN PIPE
GNAWS  OFF
BUNNY  HOP
Authors' Notes
The initial inspiration for this puzzle came from a couple of sources, one of which is The Logic Puzzle from CMU Puzzlehunt, as well as many papers my friend showed me in the past about the NP-completeness of logic puzzle genres. After watching many many logic puzzles get solved on our team by being tossed into grilops or z3, I wanted to make a puzzle where that was infeasible without a significant amount of manual work being done to truly interpret the puzzle. In fact, this puzzle is fully solvable without constraint solvers! (Although code obviously still needs to be written to parse the puzzle).
The answer for this puzzle came about while talking about possible answers for Space Modules. We were fairly constrained in finding “good” answers, and during a hack weekend, we were trying to figure out what to do with this answer slot. One person suggested writing a puzzle that contained a grid of letters as an answer, and one person wanted to write a logic puzzle, and I still needed an answer for this puzzle idea which I had lying around. This is how World's Smallest Logic Puzzles was born, and the reason for the surprise callback at the end.
Thanks to The Logic Puzzle for providing compressed gadgets in Akari, and for this paper for helping me get a foothold on constructing the Fillomino. There's a bunch more of these papers on other genres as well if you are interested!
Appendix - Solved grids
For completeness, here are fully solved grids for:
- the Minesweeper, with mines represented by X and empty cells represented by _;
- the Akari, with lightbulbs represented by * and empty cells represented by _;
- the Fillomino, in the same zip-file format as the original puzzle.
In theory, it is possible to directly derive the Akari or the Fillomino solution without using the nested block structure. In these cases, to extract the grid with the cluephrase, we should:
- from the Akari, take the subgrid which uses only every 100th row starting from row 50 and only every 80th column starting from column 43, and extract the lightbulbs;
- from the Fillomino, take the subgrid which uses only every 6000th row starting from row 2975 and only every 4320th column starting from column 2299, and extract cells equal to 1.